Manual
Configuration
 |
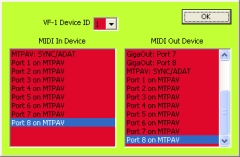 |
Click on the MIDI text on the "LCD" to bring up the dialog where you'll set the MIDI In and Out devices to which your VF-1 is connected. Set the MIDI devices (ports) to which your VF-1 is connected. You will need to make both of the MIDI connections to make full use of this software. Ensure that the selected Device ID corresponds to the Device ID of your VF-1 as well. |
Patches
 |
A Patch is representative of a patch on the VF-1. A patch has an Algorithm, and can be given a Name and be assigned to a Category. You can set a patch's algorithm to any of the 37 available algorithms at any time. You can have many different patches available concurrently, but only one of the patches is the active patch. The Active Patch is the one that's selected. Selecting one of the patches in the list makes it the active patch. When the app starts there will be one patch created, and it will default to the 10-Band GEQ Algorithm. You can change the algorithm to any algorithm type, give the patch a name, and begin editing the parameters of the patch. You create a new patch by clicking the You can delete a Patch (the active patch) by selecting it
and by using the You can Load a standard VF-1 single patch SysEx file with the You can Save the active patch to a standard VF-1 patch
SysEx file with the |
 button.
 button.
 button. The loaded patch will be added to the list and made active,
and its From field will show "file". (There are some VF-1 patches
available online - check the "BossVF1" Yahoo! group here:
button. The loaded patch will be added to the list and made active,
and its From field will show "file". (There are some VF-1 patches
available online - check the "BossVF1" Yahoo! group here:
 button. This patch can be sent to any VF-1 with any MIDI
utility/player/sequencer, and its destination will be the edit
buffer. Share your patches with others!
:-D
button. This patch can be sent to any VF-1 with any MIDI
utility/player/sequencer, and its destination will be the edit
buffer. Share your patches with others!
:-DThe Algorithm's Effects
 |
The algorithm's various Effects are selected by clicking
on the effect's icon in the area of the GUI that represents
the VF-1's LCD. When an effect is selected, its parameters
become the parameters whose controls are visible. The
selected effect is shown with the darkened icon To disable an effect ( The algorithm's Master settings can be selected by
clicking the |
 .
. ),
first select it by clicking it, and then click it a second time
),
first select it by clicking it, and then click it a second time  .
To re-enable it, click it again.
.
To re-enable it, click it again. icon (
 ).
).The Effect's Parameters
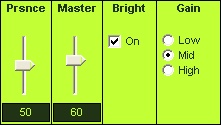 |
When an effect is selected, its Parameters become available for editing in the form of controls (GUI objects) at the bottom of the app. There is a control for every parameter within the effect. Parameter Values are changed by manipulating the control so that it has the desired value. Use the provided slider, radio button or checkbox to set the desired value for the parameter. The value of the parameter will be displayed, but this display is read-only - you can't set the value numerically in this box. The mouse wheel works great for changing the value of slider controls. When you move the mouse over a slider, it gains input focus and you can immediately begin scrolling the wheel to change the value without needing to click on the slider first. You can also use standard Windows key commands for manipulating them, like cursor up and down, page up and page down, home and end. You can reset a slider control's value to its "default" value by Ctrl+clicking in the slider area. |
Sending To And Receiving From the VF-1
You can send the active patch to either the VF-1's Edit
Buffer  or directly to one of the User Patch slots
  . You
can send to the Edit buffer at any time (ie. the VF-1 can be on ANY menu,
patch, etc.), but to send directly to one of the User Patch slots the VF-1
MUST be on the MIDI BULK LOAD menu (this is a VF-1 limitation!). In
doing so, you will overwrite the previous patch that was at that location.
Select the desired destination, and then click the
. You
can send to the Edit buffer at any time (ie. the VF-1 can be on ANY menu,
patch, etc.), but to send directly to one of the User Patch slots the VF-1
MUST be on the MIDI BULK LOAD menu (this is a VF-1 limitation!). In
doing so, you will overwrite the previous patch that was at that location.
Select the desired destination, and then click the  button.

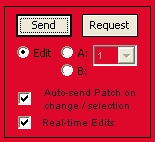
Optionally, you can have the app always automatically send the patch to the VF-1. This is done by checking the Auto-send Patch on change/selection option. This will send the entire patch to the Edit buffer any time you select a different patch, or change its Algorithm type, Name or Category. The destination is always the Edit buffer, and never one of the User Patch slots.

If you send the patch to the VF-1's edit buffer, the software and the VF-1 will be in sync. The Real-time Edits option will become available and selected. From this point onward, any change made to one of the patch's effect parameters will be immediately communicated to the VF-1 and you will be essentially controlling the VF-1 in real-time.
(Tech insight: The reason this option isn't available until you've sent the patch is because the VF-1 uses "Address-mapped data transfers". All parameter data specifies the memory address of where the parameter resides, and the new data. The memory is a flat space shared by all algorithms. If your VF-1 is on one type of algorithm and the software is on another, sending a parameter change will end up changing a completely unrelated value, which is to be expected. And what would be the point of changing a value on a patch that may or not be the same algorithm as what the software is representing? It doesn't make sense. So this is why you need to send a patch to the VF-1 first before you can start controlling it / sending individual parameters: they need to be synced! Duh.)
You can also request/receive patches from the VF-1. As with sending, you can choose to receive the contents of the Edit Buffer, or you can receive any one of the User Patches.
Requesting a patch is initiated from the app, NOT from the VF-1. However, there is a caveat: for the software to be able to make a request to receive a Patch from the VF-1, the VF-1 must be on the MIDI BULK LOAD page (under Utility -> MIDI -> MIDI BULK LOAD).
(This is a design decision made by the BOSS engineers and there's nothing I can do about it. Please blame them and not me! And please don't assume I'm being stupid and making things more difficult than they need to be - this IS how patch requesting works! It sure would be a lot handier if you could request a patch without needing to physically interact with the VF-1, but what can ya do... You might find that when you use this app, you may just want to set your VF-1 to this page and leave it there).
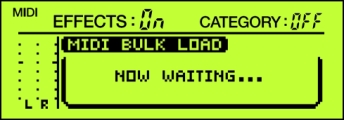
To request a patch, select the source location and then click the  button. This will cause a dialog to appear
 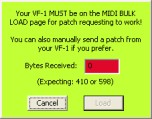 .
Provided your VF-1 is on the MIDI BULK LOAD page and everything is
setup properly, you will see that 410 bytes are received. If you
click the Load button, you will finish the receive operation and
a new patch will be created in the list of patches. A From
field conveniently shows where the Patch came from
.
Provided your VF-1 is on the MIDI BULK LOAD page and everything is
setup properly, you will see that 410 bytes are received. If you
click the Load button, you will finish the receive operation and
a new patch will be created in the list of patches. A From
field conveniently shows where the Patch came from  .
.
If your VF-1 was not on the MIDI BULK LOAD page, you will need to Cancel this, set your VF-1, and try the Receive again.
You don't need to use the patch requesting functionality if you don't want. While you have this dialog up, you can Send a patch from your VF-1. This is done from the MIDI BULK DUMP page. Note that you need to select TEMP for the type, not PATCH. Contrary to expectations, PATCH is actually the type you select for sending the User Banks, which we'll discuss in another section. When you manually send a patch you will receive 598 bytes, as opposed to 410.
The (new!) Patch Bank Librarian
 That's
right, folks, it's finally here: the bank librarian aspect!
That's
right, folks, it's finally here: the bank librarian aspect!
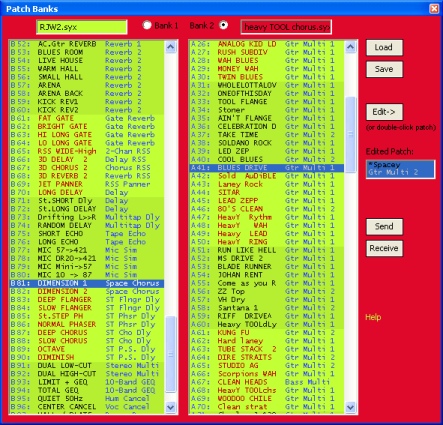
VF-1 Editor now sports a proper patch bank librarian. A bank is a collection of all 202 User Patches that the VF-1 can store. You can have 2 full 202-patch banks loaded simultaneously, so reorganizing your banks and the contents of your VF-1 should be a breeze.
When VF-1 Editor is first started, both of these banks are totally
empty, and you'll see a bunch of these: 
Select  to select a bank SysEx file to load. It will be loaded into the
bank that's selected (
to select a bank SysEx file to load. It will be loaded into the
bank that's selected ( ). You will
be warned if you're about to load into a bank that has unsaved
changes.
). You will
be warned if you're about to load into a bank that has unsaved
changes.
Note: I've gone to great effort to accommodate banks that may have some SysEx formatting issues. For my testing purposes, I used a bunch of the banks available at the "BossVF1" Yahoo! group, and I noticed that many of them had SysEx formatting issues. Apparently the user who contributed these had issues with bank corruption, likely due to the MIDI software he received the banks into, or a buggy MIDI interface driver, or something like that. As such, I decided to make my program more robust and attempt to properly handle banks with some erroneous SysEx formatting/corruption. Hopefully the program correctly extracts the majority of the patches in your banks. If a few were unable to be salvaged, rest assured that it's NOT because of my incompetence but rather because of SysEx formatting errors...
 lets you save the selected bank to a SysEx file. You will
not be allowed to save a bank if it contains any empty patches. If it has
empty patches, it's not really a bank, now is it?
lets you save the selected bank to a SysEx file. You will
not be allowed to save a bank if it contains any empty patches. If it has
empty patches, it's not really a bank, now is it?
 and
and  are used to send a full bank (the selected bank) to your VF-1 to
replace its 202 User Patches, or to receive all 202 User Patches
from your VF-1 and load them into the selected bank slot.
are used to send a full bank (the selected bank) to your VF-1 to
replace its 202 User Patches, or to receive all 202 User Patches
from your VF-1 and load them into the selected bank slot.
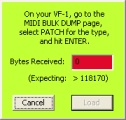 |
Selecting Receive brings up this dialog. When you receive a bank, unlike with Patches, the transfer is NOT initiated from the software. Instead, you must manually go to the MIDI BULK DUMP page on your VF-1, select PATCH for the Type, and then hit Enter. It will take a while for the bank to transfer. Ideally a bank is exactly 118183 bytes, but when you send the bank of user patches from the VF-1, it also sends the contents of the edit buffer as well, which we don't need. The result is that the VF-1 should be sending 118781 bytes. However, if you have issues with sketchy hardware or a buggy MIDI interface driver, you could conceivably receive more or fewer bytes. If you get fewer than 118170 bytes, the transfer was too corrupted and you'll need to send it again. If you receive more than that, I have logic to identify and extract the patch data for 202 patches, while ignoring anything else. |
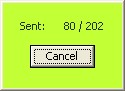 |
When sending a bank to your VF-1, you must be on the MIDI BULK LOAD page. After you click Send, you might see a Cancel dialog pop up. If your MIDI interface's driver sends synchronously, you will have the opportunity to watch the transfer progress and cancel the send if you wish. If your driver sends asynchronously, this dialog will quickly close and it will appear that the bank has been sent, but that will not be the case. The transfer takes quite some time, and you will see the MIDI activity display on your VF-1 being constantly lit until the transfer is complete. You MUST keep the program open until the transfer has completed. In this asynchronous case, there is no way to test the driver to see if it's done sending or not, because it has already given the impression that the transfer IS done, when it's not. You will need to wait and give Windows time to send the bank, otherwise the connection will be closed before the transfer's complete. |
Bank Editing
Once you've loaded a bank from a file or your VF-1, you can easily rearrange & organize your patches. The moving of patches is done with basic drag-and-drop functionality. You can rearrange patches within a bank and transfer patches between banks.
 |
A normal drag-and-drop operation (no system keys being held) lets you move a patch to a new location within the bank, inserting it before the patch at the location under your cursor. However, if you are doing this between banks, it does a copy instead of a move. Within the same bank, only the order is changing so the number of patches doesn't change. But, when you're going between banks, the insert is going to add a patch, causing all of the patches after the new location to be bumped down one position and kicking patch B101 out of the bank! |
 |
A drag-and-drop with the Ctrl key being held lets you overwrite the patch at the target location, performing a Replace. The source patch is copied, not moved. |
 |
Finally, performing a drag-and-drop with the Alt key held results in the two patches being swapped. Note: You cannot swap with an empty patch. |
Lastly, you can Delete a patch by selecting it and hitting the Del key. This causes all following patches to move up one position, and an Empty patch being added at the end of the bank.
To Edit one of the patches in a bank, simply double-click
it. (Alternately, you can select the bank and select the patch and hit
the  button, but that seems silly. I just included it because not everyone
reads the instructions, and they might not realize that this double-click
functionality exists).
button, but that seems silly. I just included it because not everyone
reads the instructions, and they might not realize that this double-click
functionality exists).
When you've selected a patch for editing, it appears in the Patch display of the main window. You can then edit it just like expected.
 |
When you're done editing the patch, double-click it the
main patch display, or select it and click the |
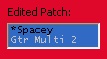
 button. This causes the patch to be sent back to the Banks window,
and it will appear in the Edited Patch: control. From here,
you can drag the patch to any bank slot you want. The same editing
types apply: Replace or Insert (you can't Swap because that doesn't
make sense).
button. This causes the patch to be sent back to the Banks window,
and it will appear in the Edited Patch: control. From here,
you can drag the patch to any bank slot you want. The same editing
types apply: Replace or Insert (you can't Swap because that doesn't
make sense). |
Finally, the last feature pertaining to banks is the Bank
navigation buttons near the main Patch display. These buttons
enable you to navigate through the patches in the bank, transferring
them to the main window and displaying them for editing. For this
to work, you need to have a bank loaded and it must be the bank that
is selected. Clicking the |
 button advances to the next patch in the bank, and
  moves to the previous patch in the bank. When the end of the bank
is reached, navigation will wrap around to the other
end.
moves to the previous patch in the bank. When the end of the bank
is reached, navigation will wrap around to the other
end.Global Settings and the LFO Generator
 |
Clicking the The Global settings should be pretty self-explanatory.
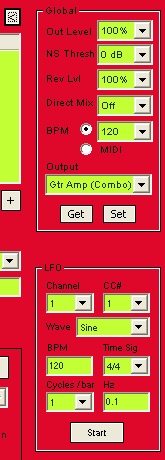
Use The LFO Generator is an exciting new feature! With this generator, you can modulate any of the VF-1's controllable parameters for wacky changes to your sound. Since MIDI CC's are potential modulation sources on the VF-1, this LFO generator sends standard CC messages to the VF-1, and if any of its 4 controller assignments sources have been set to the corresponding CC, the selected destination parameter will be modulated by the LFO. Make sure the Channel is set to the channel that your VF-1 is listening to, or ignore this setting if your VF-1 is set to Omni mode. Pick a CC# to use (1 should do in most cases), and then select your desired Wave type and frequency (Hz). The BPM, Time Sig and Cycles/bar controls are there to help you make frequency calculations. Changing either of these values will result in a new frequency being populated in the Hz field. It's ultimately this Hz field that determines the frequency of the LFO. If you want to manually input your own frequency, make sure you don't click or tab to either of those 3 fields, as they will replace the frequency that you set manually.
For this LFO to accomplish anything, you need to have a controller assignment properly set up. Under the Master settings, pick one of the 4 controller assignments, and set its Src Type to the CC# that you've selected for the LFO. Set the Src Min and Max to 0 and 127 respectively (the LFO generates data values between 0 and 127 to make optimal use of MIDI's limited step resolution). After that, simply select the Target you want to modulate, along with its Min and Max values, and you're ready to rock out! 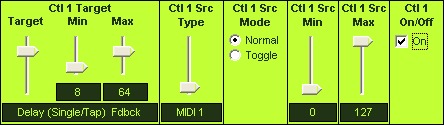
(A few words of warning: You will probably want to have the LFO off until you've set up your modulation assignment. The reason is, if you're cycling through the controller targets with the LFO active, you could potentially be leaving that parameter at a value that's way out of line with where it began. The controller assignment parameters always stay at the last value they were changed to, naturally. Your patches can deviate far from where they started in a very short amount of time. You've been warned!) |
 button expands the application window and reveals two groups of
controls, one for the VF-1's Global settings, and one for the
editor's built-in LFO Generator. Click the
button expands the application window and reveals two groups of
controls, one for the VF-1's Global settings, and one for the
editor's built-in LFO Generator. Click the  button hides these controls.
 to retrieve the global settings from the VF-1, but again make sure
that you're on the MIDI BULK LOAD page (annoying, I know!). You can
to retrieve the global settings from the VF-1, but again make sure
that you're on the MIDI BULK LOAD page (annoying, I know!). You can
 the global settings at any time, regardless of which screen or menu
the VF-1 is on.
the global settings at any time, regardless of which screen or menu
the VF-1 is on. or
or  the LFO at any time.
The End.

BOSS and the BOSS logo are registered trademarks of BOSS Corporation.
The VF-1 Editor application and this site are copyright © 2010 Ryan Wrubleski